
Site Planning Tools | Hammer Missions
- Hammer Missions

- Dec 22, 2022
- 4 min read

Overview
As all drone operators know, site planning is a key element to flying your drone safely when carrying out flights for clients or stakeholders.
Site planning can also be key when planning your project, from flight radius planning to mark important locations...
Here at Hammer Missions, we have developed a vast array of tools to make this easier and they are all accessible directly from the Hammer Hub
In this article, we will look at what tools are available and how to use them.
The tools are listed below for quick access:
Mark an Important Location
1: Open your mission file in Hammer Hub and select the wand icon as shown below in red.

2: Now the wand menu is open select the dot as shown below in red.

3: Now you can select an area on your mission map to mark as an important location.

4: You will notice that the important location is currently unlisted. Click the gear icon next to the star to name this location as shown below.

5: Once you are happy with the name press done (in the top right corner) and your important location will have a name.

Measure a Distance
1: Open your mission file in Hammer Hub and select the wand icon as shown below in red.
2: Now the wand menu is open select the line as shown below in red.

3: With the line now selected you can mark two points on your mission plan to create a measurement line as shown below. The line is overlayed in white.

4: When you are happy that your measurement line is in the correct position press OK on the right-hand side of the screen. This will now highlight in yellow and give you the desired measurement, in this instance, it is 114ft.

5: By pressing the gear icon next to the measurement you can give the measurement a name, as shown below:

6: Once you are happy with the name press done in the top right-hand corner.

Measure Areas
1: Open your mission file in Hammer Hub and select the wand icon as shown below in red.
2: Now the wand menu is open select the polygon as shown below in red.

3: Now you can draw a polygon over the desired area you want to measure. Shown here in an overlay of white above the house.

4: Once you are satisfied with the selected area press OK and the area will turn yellow giving you a measurement in square feet. If you need to adjust the polygon you can drag the yellow dots to make the measurement larger or smaller.

5: You may wish to name this measurement, if so select the gear icon within the polygon and give the measurement a name.

6: Once you are satisfied with the name press done in the top right-hand corner.

Flight Radius Planning
1: Open your mission file in Hammer Hub and select the wand icon as shown below in red.
2: Now the wand menu is open select the circle as shown below in red.

3: You will now see a small cross-hair on the screen, navigate to the middle of your desired flight area and select it. In this example, we have zoomed out to show you the default setting.

4: Select the gear icon underneath the given altitude to open the settings. With the settings open you can now change the flight radius by adjusting the slider.

5: As you can see below, the radius has been adjusted to 200ft and a name has been added (mission radius)
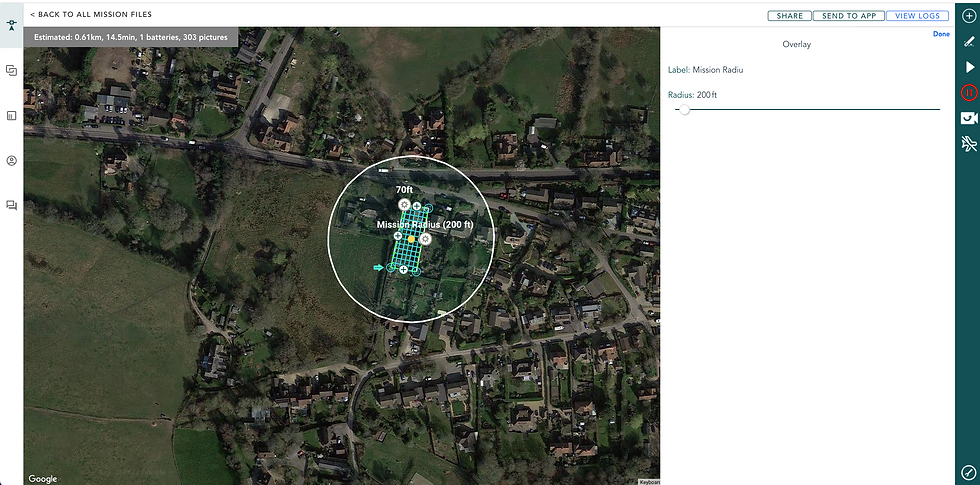
6: When your happy with the radius and label press done in the top right-hand corner to save this information.

Missions Available in Hammer Missions
So now we have discussed what planning tools are available to you in Hammer Missions we will look at the missions you can use those planning tools on.
Hammer Missions has many different types of missions to choose from, more information can be found below by clicking on the individual links that are available:
Obstacle Avoidance with Hammer Missions
Most of the up-to-date drones have obstacle avoidance now built in, but wouldn't it be great if you could preplan this with software before you fly?
With Hammer Missions you can do exactly that!
This module is useful for defining no-fly zones/obstacles in the drone's path. Select this module and mark a polygon on the map and Hammer will generate a flight path that avoids the obstacle while flying other missions.
The video below shows how you can achieve this whilst planning your mission.
For further information on ObstacleAvoidance please see the following article:
Summary
We hope this blog post helps you understand the planning tools and missions available to you in Hammer Missions
If you'd like to learn more about how to high-quality data and get the most out of your drone missions, please feel free to visit our learning resources.
If you haven't got a Hammer account as yet and would like to try Hammer Missions you can get started on our free trial.
To learn more about our enterprise solutions, including mission collaboration, data processing, and AI solutions, please contact us at team@hammermissions.com.
We look forward to hearing from you.
— Team at Hammer Missions


