
Solar Panel Inspections in Hammer Missions
- Hammer Missions
- Dec 15, 2020
- 4 min read
Updated: Feb 6
Overview
Hammer Missions is a drone flight planning and 3D mapping software platform designed for the commercial drone industry. We support a large number of mission types on both mobile tablets through Hammer App and web-based environments through Hammer Hub.
Whether it's inspection, mapping or 3D models, Hammer Missions can adapt to it.
Tutorial
In this tutorial, we will focus on solar inspections — 1 of the many inspection missions supported by Hammer. If you prefer watching a video tutorial instead, here's one below:
Solar Inspection
This type of inspection is useful for aligning your drone directly on top of solar panels for closer inspection and analysis using a visual or thermal camera.
In this mission, Hammer generates a flight plan based on your the polygon (area boundary) and points (solar panel rows) input by the pilot. Hammer then calculates a flight path ensuring that the flight lines pass through the marked solar rows. Hammer also gives you options to configure the drone orientation, row angle and other settings for the mission.
You can think of it as a regular grid mission with additional options to mark & configure solar panel rows and settings.
Steps to Create
Tap on the new mission file icon to create a new mission file. Rename the file.
Tap on the add(+) button in the right side panel.
Choose ‘Solar Inspection’ from the available missions.
Draw a polygon to mark the solar farm area to be inspected.
Tap OK.

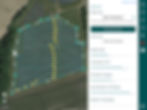
Marking the area boundary for solar Inspections
Steps to Configure
Tap on the white gear icon on the mission you wish to configure.
This will open a settings menu.
Tap on the Mark Solar Panels button.
Hammer will prompt to mark the solar panel rows. Tap on the map to mark the solar rows. Add as many rows as you like. Then tap OK.
Hammer will generate flight lines passing through the marked points.
Adding solar panels to the solar mission
Note: Solar panels can also be marked on the map by flying the drone in the field manually and aligning it on top of relevant solar panels, using Hammer's fly-to-draw functions.
6. Now configure the remaining settings in the menu - all relevant to solar panel inspections:
Brief description of the available settings:
Camera Type: The camera to be attached to the drone for the inspection. Hammer will use this camera's focal length and field of view to estimate the image / video footprint on the ground.
Front Overlap: The % of overlap between images of the solar panels.
Row Angle: The angle of the flight lines. By default, this is set to 0 (north-east), which is aligned with solar panel rows.
Drone Orientation: The orientation of the drone as it flies between flight lines. The orientation is useful to reduce glare from the sun while conducting the inspection. This orientation is visualised on the map by the arrow on top of the solar panel markers.
Gimbal Tilt: The tilt / pitch of the drone's gimbal. By default this is set to -90' degrees but can be adjusted to account for the pitch of the panels. Record Video: This ensures that the drone records video during the mission as opposed to taking pictures with specific overlap.
Reverse Flight Path: This starts the drone mission from from the opposite end, useful for scenarios where you'd like the inspection to begin closer to the takeoff location.
Terrain Awareness: This adds terrain awareness to the flight path. You can learn more about terrain awareness options using our guide on terrain following.
Steps to Simulate
Once you are finished creating and configuring the mission, simply press play button in the right panel.
If no drone is connected, Hammer will prompt you to add a simulator, press OK and choose a home location for the simulation. Then press OK.
The simulation will begin and you’ll see a simulated drone appear on the screen flying the solar inspection mission.
Steps to Fly
Once you are happy with the created mission, simply connect your drone to Hammer through the USB port on the remote controller.
You’ll see a drone icon appear on the screen at its current location.
Press Play to start the mission.
Press Pause anytime to pause the mission, and play to resume the mission.
Post Processing
You can analyse the data by uploading it to our data analysis platform on Hammer Hub.
Summary
And…that’s it! Now you know how to create, simulate and fly your own solar inspection mission in Hammer. If you currently do not have access to the iOS app, feel free to contact us through hammermissions.com or download the app through the app store.
If you’d like to learn more about other missions supported in Hammer, please visit our mission tutorials.
To learn more about our enterprise solutions, including mission collaboration, flight analytics and more please contact us at team@hammermissions.com