
Flight Planning For Unlocking DJI Drones In No Fly Zones
- Hammer Missions

- Jul 19, 2022
- 5 min read
Updated: Aug 23, 2022

Overview
In this guide, we will establish how to unlock DJI Drones to enable flight planning in defined Geo-restricted (no fly) zones.
DJI is one of the leading brands in drone technology and is often seen as one of the top innovators in drone safety.
As a leader in drone safety, DJI implemented its own Geo Zone system also known as a No Fly Zone.
GEO zones that prohibit flight are implemented around locations such as airports, power plants, and prisons. They are also temporarily implemented around major stadium events, forest fires, or other emergencies.
Certain GEO zones don’t prohibit flight but do trigger warnings that inform users of potential risks.
The Hammer Hub has a built-in No-fly Zone map that enables you to quickly check if your planned flight falls within any of these Geo Zones or No-Fly Zones. To access the No-fly zone map on the Hammer Hub click the aircraft icon on the right-hand side of the screen.
Before you fly it is highly recommended that all of your equipment is up to date and has the latest firmware installed, this includes not only the drone but any accessories, including the DJI App and CrystalSky monitors if you use them.
In this post, we will take you through how you unlock those Geo Zones (No-Fly Zones) to enable drone flights in those specified restricted areas.
DJI Geo Zones (No-Fly Zones)
So what are Geo-Zones and what do they look like?
DJI’s GEO Zone System defines where it is safe to fly, where flight may raise concerns, and where flight is restricted.
DJI have created their own GEO Zone map that defines areas of concern when planning your flights. You can check this map on their designated GEO Zone website:
Each zone has its own category and is colour coded.

You will see from the example above that areas on the map are coloured to determine their severity.
The key below gives you an indication of what each colour means and how that may affect your planned flight.

The example above has three defined coloured areas, Grey, Blue, and Red. As you can see from the key these are as follows:
GREY: Altitude Zone, these will present themselves as a warning on the DJI App and flight altitude will be limited.
BLUE: Authorisation Zone, these present themselves as a warning on the DJI App, and flight is limited by default. These zones may be unlocked on the DJI App by authorised users with a verified DJI account.
RED: Restricted Zone, these will present themselves as a warning on the DJI App and flight will be prevented. To unlock these zones you will need to contact flysafe@dji.com or perform an online unlock.
As you can see from the last two examples, blue and red, there are times when you will need to unlock your drone to perform a flight, so how do we perform an unlock to operate in those authorised or restricted areas?
DJI Unlock
There are two methods of unlocking your drone to fly in restricted or authorised areas. These are known as custom unlocks and live unlocks, here we will discuss unlocking your drone in both Authorisation Zones and Restricted Zones.
Authorisation Zones
Authorisation zones, those zones that are BLUE, require an unlock which can be performed both in the DJI app or on the FlySafe website. Here we will discuss unlocking using live unlock:
Live Unlock
Live unlock is available in a BLUE zone and involves unlocking your drone in the field before performing your planned flight, this is done in the DJI App.
You will need to make sure your device has an internet connection for the authorisation to be established.
You will be notified that you are in an authorisation zone the moment you start the props, the following steps will allow an unlock for 24 Hours.
1: The app will notify you that you have entered an Authorisation zone and ask if you wish to apply for a self-unlock to access it. Press Ok to continue.

2: Check both boxes and press OK

3: You will be prompted to enter your phone number, make sure you have the correct country code. This is for identity authentication, you will also have to check the box to agree to the DJI Geo Zone Unlocking Conditions.

4: You will receive a text message to verify your identity, input this here.

5: Confirm that you are authorised by checking the boxes and then press OK

6: Once you press OK you will see the notification that unlocking was successful

You can also use a custom unlock to fly in an Authorisation Zone, this requires you to have a verified DJI Account. Custom unlocks are used as an alternative method of unlocking for Authorisation Zones and are the only way to unlock a Restricted Zone.
In the next section we we look at how you unlock using custom unlock.
Restricted Zones
Restricted zones, those zones that are RED, require a custom unlock which can only be performed on the FlySafe website and requires you to have a verified DJI Account which can be set up on the FlySafe site. Here we will discuss unlocking using custom unlock:
Custom Unlock
1: Navigate to https://www.dji.com/flysafe and scroll down the page until you get to the section labeled Unlocking Requests

2: Click 'Unlock A Zone' and you will be presented with a log-in page

3: From here you can create a DJI Account or log in to one you have previously created. For the purpose of this tutorial, we will assume that you have already created one. Log into your DJI account.
4: Once you have logged in you will see the page where you can request a new unlock. You will see from this example that some unlocks have already been authorised (some information redacted)

5: From here select 'New Unlock Request'

6: Once you have selected 'New Unlock Request' you will have to agree to the terms and conditions and then select which type of unlocking you require.

7: Custom unlocking allows you to draw a circle or polygon anywhere on the map to apply to have that specific area unlocked, Zone unlocking allows you to select the entire GEO Zone as defined by the colours on the map and unlock that area. This also includes authorisation zones as previously discussed.
8: Once you have selected your method of unlocking press confirm, in this example, we have selected custom unlock. You will be presented with a page to input your basic information.

9: Input your information which will include your organisation and drone/drones that require the unlock and press next

10: The following page lets you select your custom unlock area, the altitude you require, and the reason behind the request to have the restricted zone unlocked. You can also upload and supporting documents for your unlock for example agreements with local authorities or NATS authorisation.

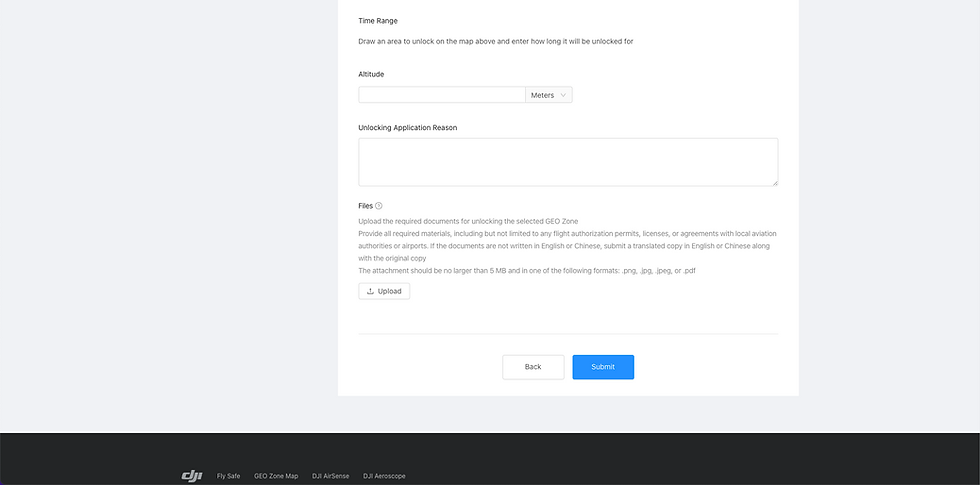
11: Once you have inputted the information and uploaded any supporting documents select submit.
DJI tries to review and process all custom unlock requests for Authorized, Restricted, and Altitude Zones within 30 minutes.
You can review your unlock requests, and can sort them by Waiting for Review, Under Review, Accepted, or Rejected and you will receive an email once a decision has been made.
Once the application has been accepted by the FlySafe Team you will be issued a certificate which will be accessible in your DJI App, this can then be actioned to unlock the designated restricted or authorised zone.
Conclusion
We hope this guide helps you understand the flight planning behind unlocking DJI Drones in restricted GEO Zones.
Once you've unlocked your drone, you probably want to collect high-quality data from the field. If you'd like to learn more about how to capture high-quality data and get the most out of your drone flights using our cloud-based platform, please feel free to visit our learning resources.
If you haven't got a Hammer account and would like to try Hammer Missions you can get started on our free trial.
To learn more about our enterprise solutions, including mission collaboration, data processing, and AI solutions, please contact us at team@hammermissions.com.
We look forward to hearing from you.
— Team at Hammer Missions


