
Terrain Follow in Hammer Missions
- Hammer Missions

- Jun 10, 2022
- 2 min read
Updated: Sep 19, 2022

Overview
In this tutorial, we will focus on how to use Terrain Follow in Hammer Missions. This is a feature that allows the collection of more accurate data for mapping, 3D mapping and magnetic survey missions' challenging terrain by adjusting the mission's altitude to maintain a constant GSD (ground sampling distance).
Please Note: To use this feature requires you to have an internet-connected device or a relevant DEM/DSM file (Digital Elevation Model / Digital Surface Model) for your mission area.
As described above, there are two methods for obtaining the relevant Terrain Map for your desired mission, internet-connected or a custom DEM/DSM file.
Nasa SRTM Data (Internet Connected)
This is the default method and obtains the terrain information from the internet, via your network-enabled device, and generally has an accuracy of 30 to 90 Meters.
DEM/DSM File
This would be our recommended method of obtaining the terrain information but requires you to import the data into the Hammer App in a GeoTIFF format.
Tutorial
Create your Mission as standard, this could be a Mapping Mission, 3D Mission, or a Magnetic Mission for example. Once your Mission has been created select the Gear Icon to open the parameters for that mission.
Method One (Default Nasa SRTM)
Scroll down until you get to Terrain Awareness and switch the toggle to on

Once the toggle has been switched to on you will be presented with an option to select the data source, in this first example we will select the default, Nasa SRTM

Press Done and it will ask you to select a Take Off Point, select where you want to take off and it will apply the Terrain Data. Please remember that your device must have an active network connection for this to work.

Method 2 (DEM/DSM Import)
Repeat the process from Method 1 to switch Terrain Awareness on. This time select Import New File

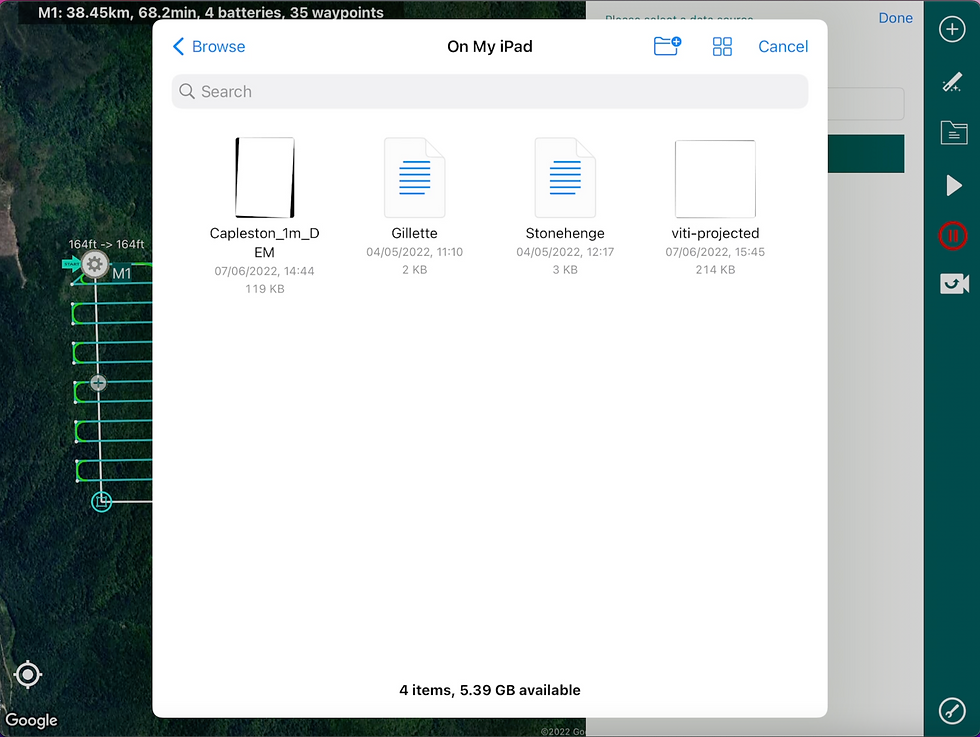
Change to Digital Surface Model (Custom) and then this will open up an option to Browse for your GeoTIFF file (which must be saved in your files folder for accessibility)

Select your GeoTiff file, in this example, we will be using Capleston_1m_DEM
Once your file has been selected it will import and request that you select a Take Off Point this will apply the terrain data from the imported DEM/DSM file and adjust the mission accordingly.

You can now select Done and this will take you back to the previous screen. You will now notice that there is a new graph underneath Terrain Awareness, which depicts the lowest and highest altitude in the mission, required to keep a constant GSD. Feel free to adjust the flight altitude and overlap by selecting Edit, this will trigger Hammer to replan the mission with a new altitude range.

Conclusion
In this guide, we looked at how to Use Terrain Follow in Hammer Missions
If you'd like to learn more about how to produce high-quality data and get the most out of your drone missions, please feel free to visit our learning resources
If you haven't got a Hammer account as of yet and would like to try Hammer Missions you can get started on our free trial.
To learn more about our enterprise solutions, including mission collaboration, data processing, and AI solutions, please contact us at team@hammermissions.com
We look forward to hearing from you.
- The Hammer Team


