Top 5 things to consider while inspecting solar farms with drones
- Hammer Missions

- Feb 9, 2022
- 5 min read
Updated: Mar 14, 2022

Since modern commercial drones can cover large distances and capture high-resolution images, many companies have been able to optimize the efficiency of time-consuming tasks. New technological developments have provided drone operators inspecting solar farms with accurate data that has enabled them to carry out routine operations more efficiently. Drones can not only cover large ground in an efficient manner but also provide a safe and reliable way of conducting repeat inspections every few months.
With constantly changing renewable energy targets, solar companies are enhancing their energy plant operations to increase efficiency, and drones are playing a critical role in ensuring their customers have reliable and affordable energy.
So you’re planning to inspect solar farms with modern commercial drones, here are the top 5 things to keep in mind.
1. Choosing the Altitude & GSD correctly
When you arrive at the solar site, you should follow your standard inspection checklist and review all hardware thoroughly to confirm it meets operating conditions. As you begin the first flight of the solar inspection, you should confirm that all flight parameters are correctly set up in the mission planning software of your choice, that there is sufficient irradiance (600 watts/meter2), and that GSD (ground sample distance) and overlaps are set correctly.
Two of the parameters to carefully consider are Altitude and GSD. Choosing a lower altitude would mean a lower GSD and would result in high-resolution photos. However, your flight might take overall longer and there might be safety considerations to bear in mind. On the other hand, flying a high altitude would result in a safer and a more efficient flight, but the captured images may not have the sufficient detail required for the PV inspection.
It’s important in such situations to understand the requirements from your clients or stakeholders and make an informed decision on the site. You can learn more about GSD here.
One potential solution is to conduct a high-altitude overview flight with the visual RGB camera and then to perform a low-altitude flight with the thermal camera for details.
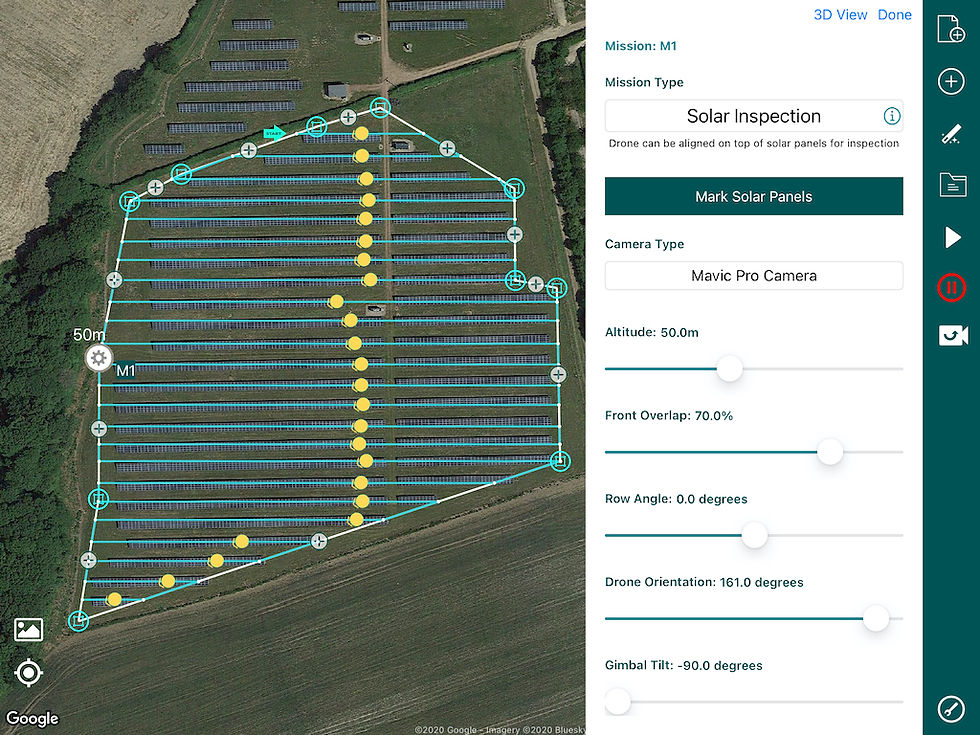
We’ve made this super simple in our flight software Hammer Missions, where you can select ‘Mapping’ and ‘Solar Inspection’ mission modes for conducting the 2 different types of flights.
2. Aligning the drone with the solar panel rows
When conducting a thermal powered solar inspection, it's important to remember that sometimes it is necessary to get up close to the panels due to the lower resolution of the thermal camera.
By aligning the drone with the solar panel rows, you can capture the exact data you need at high resolution, and minimize capturing excess data by not flying over the gaps in between solar rows. This also makes the whole flight at lower altitudes a lot more efficient.
We’ve designed Hammer's solar inspection module to automatically align the drone’s flight path with the solar rows. As you plan a solar farm mission from your office, you can use the Row Angle (the angle of the flight lines) setting on Hammer Hub.
By default, this is set to 0 (north-east), which is aligned with solar panel rows.

3. Keeping Sun’s Glare Away
During a solar inspection, it’s important to keep the nasty glare away from images. Let’s explore this in a bit more detail.
High levels of solar irradiance (i.e. a sunny day) are good. Sunlight highlights how defective components differ from normal ones. A properly functioning module converts this solar energy into electricity, while a malfunctioning module generates heat.
The sun, however, brings glare. Glare will cause your images to look white because the panels will reflect the sunlight directly into your camera. The best time to fly is early in the morning or late in the afternoon to avoid this problem.
Another way to tackle this problem is to fly the drone throughout the mission with a preset orientation, based on the location of the sun in the sky. You can do this using Hammer Missions’ solar inspection mission, which allows you to preset a drone orientation for the entire flight.
So by flying at the right time of the day and using a constant pre-set orientation, you have all the tools you need to avoid glare and collect the best data possible!

4. Matching the Gimbal Pitch of the Panels
As you are aware, the majority of solar panels are pitched from the ground up, and for this reason, it makes sense to survey these panels at an equal camera pitch. This ensures that the captured images have a nadir view of the panels and none of the solar cells are obscured from view.
You can set the gimbal tilt (pitch) setting in your flight software to change the pitch of the camera as the drone flies. By default, this is set to -90' degrees but can be adjusted to account for the pitch of the panels. One good way to figure out the correct tilt setting is to manually fly the drone on top of a sample solar panel and adjust the camera tilt manually till it aligns perfectly with the natural pitch of the solar panels.

5. Using the Drone to mark the Site Polygon
One common issue with new solar farm sites, is that you might not be able to find the farm on Google Maps or other mapping service used by your mission planning software. This means, that unless you have an accurate KML file handy, you will have to guess where the site boundary on the map.
If calculated incorrectly, this can lead to missing or overflying areas of the site, and thus wasting previous drone battery life.
To combat this issue, one solution is to manually fly the drone to create the site boundary.
To make this workflow super simple in Hammer Missions, we’ve added a feature called fly-to-draw. Using this feature, you can fly your drone manually to the key points of the site polygon and tap on the drone icon on the map or the C2 button on the remote controller, and Hammer will automatically take the drone’s current position as input.
This provides you with a quick and efficient way to input the site boundary so that you’re quickly underway with your solar survey.
Summary
In this guide, we looked at 5 things to keep in mind for your next Solar Farm Inspection with a drone. If you'd like to learn more about Solar Inspections, please feel free to visit our learning resources.
If you haven't got a Hammer account as yet, and would like try Hammer to automatically calculate the flight speed for you, you can get started on our free trial.
To learn more about our enterprise solutions, including mission collaboration, data processing and AI solutions, please contact us at team@hammermissions.com.
We look forward to hearing from you.
— The Hammer Team