
Precise Asset Inspections using Fly-To-Draw in Hammer Missions
- Hammer Missions

- Mar 22, 2021
- 4 min read
Updated: Feb 2, 2024

Overview of Drone Asset Inspections
Planning an automated flight to survey physical assets/infrastructure can be challenging.
One of the main challenges is the observed discrepancy between Google Maps or other mapping services used by the mission planning app and the real world. Sometimes, this discrepancy can be as high as 10m, which means planning a mission simply using Google maps or similar can be unsafe and imprecise.
Planning asset inspections mission simply using Google maps or other mapping service can be unsafe and imprecise.
Use the Drone as a Measuring Tool
So how can you ensure that your planned flight is both safe and precise? One solution is to fly the drone manually around the target asset (roof, tower, wind turbine, etc) for the first time and create the mission plan using the drone as a measurement tool.
In Hammer, we make this process dead easy. Simply fly your drone around the target of interest and tap on the drone icon on the screen to add a 3D point to the mission plan.
But how does this process work in practice for different mission types? Let's have a look.
Mission Specific Setup
1. Roof Inspection Mission

For roof inspection missions, all you need to input using the drone are the corners of the roof.
To do this, create a roof inspection mission in Hammer, fly your drone to each corner of the roof, and tap on the drone icon on the screen to capture the roof's polygon boundary. Hammer will generate the default flight plan based on the roof's geometry, and you can then adjust the flight parameters by tapping on the gear icon.

Creating a roof inspection in Hammer by flying the drone to the corner points.
2. Facade Inspection Mission

For facade inspection missions, Hammer needs to you to mark a poly-line representing the edge / boundary of the building facade. You can either fly your drone as close to the building as possible and tap on the drone icon to create the poly-line, or place the drone in front of the building floor (switched on) to record the GPS location.
Then fly the drone to the top of the building and tap on the little drone icon next to the top altitude setting. Repeat for the bottom altitude setting and you're good to go.

Setting up a Facade Inspection using fly-to-draw
3. Tower Mapping Missions

Tower Mapping missions typically require you to input the centre point of the tower and the radius to maintain from the tower while mapping. The centre of the tower can be input by flying the drone above the asset and positioning it at its centre. This can be then input into Hammer by simply tapping the drone icon on the screen. Other parameters that you may need to enter include the target radius and the flight radius. You can input these by flying your drone to the required GPS point and then making use the input fetchers in Hammer.

Setting up a tower missing using fly to draw in Hammer
4. Solar Panel Inspections
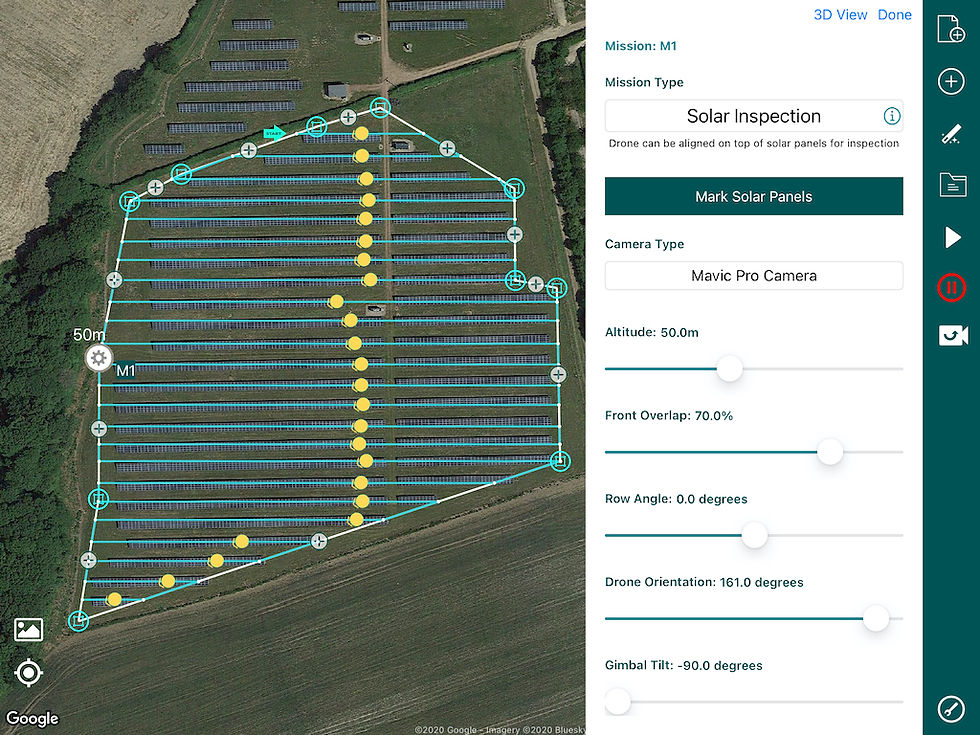
Solar Panel Inspections in Hammer typically require you to mark the area of interest, followed by the individual rows that you'd like to inspect. You can mark these on the map, but once again, for a more precise survey, it's best to use as the drone as a measurement instrument, fly them to the relevant points and input them into Hammer by simply marking the drone icon on the screen.
5. Wind Turbine Inspections
Wind Turbine Inspections typically require creating 2 different flight plans, one for each facade of the wind turbine. We recommend creating each flight by flying the drone to the terminal points of the blade, then down the centre and then along another terminal point of the blade. This process can then be repeated for all blades and the foundation of the turbine (if needed) to create a flight path for the drone.
Post Processing
Once you've collected the data, we recommend using a data inspection platform to sift through the images and annotate your findings. You can even run your data through AI-based defect detection software to speed up your analysis process. If you'd like to learn more about data processing options through our partners, please feel free to get in touch with us at team@hammermissions.com.
Summary
We hope this guide provided you with an insight into how to use your drone to design an extremely precise survey mission. Every mission is slightly different, so don't be afraid to add your own creativity to the data capture process!
At Hammer, we provide an extremely adaptive flight planning platform for commercial drones, that helps you capture the best data possible for your specific needs. If you'd like to try Hammer, feel free to our web platform here and also download our iOS app through the App store.
If you're interested to learn more about our enterprise solutions, including mission collaboration, flight analytics and more please contact us at team@hammermissions.com.
We look forward to hearing from you.
- The Hammer Team

