
How to use Drone 2D Maps and 3D Models in AutoCAD and Revit BIM?
- Hammer Missions

- Jan 8
- 5 min read
If you work with drone data in architecture, engineering, or construction (AEC), you’ve probably heard the phrase: “It’s not about the drone. It’s about the data.”
And that’s true — but it raises an important question:If drone data is the real value, how do we make that data truly useful for architects, engineers, and contractors?
In this article, we’ll walk through a practical, end-to-end workflow for transforming raw drone imagery into formats that fit seamlessly into CAD and BIM environments, helping AEC professionals make better, faster, and more informed decisions.
Why Drone Data Is Captured in the First Place

Drone data is rarely captured “just because.”In almost every AEC use case, data is collected to answer a specific question or support a specific decision:
How accurate is the existing roof geometry?
What does the building façade look like in detail?
Can this site be measured safely without physical access?
How does the existing structure fit into a wider BIM model?
To answer these questions, drone data often needs to be transformed into formats that architects, engineers, and contractors already use — such as CAD drawings, elevation views, or BIM models.
Making drone data useful starts by understanding what the final output needs to be.
Step 1: Capture Drone Data the Right Way
Everything starts with capture — and capture should always be driven by the end deliverable.
Before flying a drone, ask:
Are we producing a 2D CAD drawing?
Do we need elevation drawings?
Is the goal a 3D BIM model?
Capturing for 2D CAD Outputs

If your final output is a 2D CAD file, your capture strategy should focus on 2D accuracy, not unnecessary 3D complexity.
Examples include:
Roof drawings
Elevation drawings
Topographic surveys
In these cases, flight planning should prioritize:
Consistent nadir or façade imagery
Proper overlap for 2D processing
Accurate scaling and georeferencing
While 3D data can be useful, capturing excessive 3D information for a purely 2D deliverable can add time, cost, and complexity without clear benefit.
Capturing for 3D BIM Outputs

If your goal is a BIM model, the approach changes.
Producing usable 3D data means capturing:
Roof geometry
Facades
Building envelopes
Structural features
This requires:
Carefully planned 3D flight paths
Multiple camera angles
High overlap
Complete coverage of the structure
In short, the end output determines the flight plan, not the other way around.
Step 2: Process Drone Data into 2D Maps or 3D Models

Once data is captured, the next step is processing.
Raw drone imagery is just that — raw. To be useful, it must be processed into:
2D maps (orthomosaics, elevation mosaics)
3D models (point clouds, meshes)
Depending on your goal, you may:
Process data purely in 2D
Process data in full 3D
Or generate both outputs from the same dataset
Understanding which outputs you need — and in which formats — is essential before moving forward.
Platforms like Hammer Missions allow teams to upload drone imagery, process it using photogrammetry, and generate both 2D and 3D outputs suitable for AEC workflows.
💡 Enjoying these insights? Subscribe to the Hammer Missions newsletter for expert tips, real-world drone inspection case studies, and the latest updates on how AI is transforming building assessments:
Step 3: Export Drone Data in the Right Formats
In the AEC world, file formats matter.Every tool has specific input and output requirements, and using the wrong format can break the workflow.
Exporting 2D Data for CAD
For 2D workflows, the most common export is a TIFF file, often a GeoTIFF.
Why GeoTIFF?
It is georeferenced
It preserves scale and spatial accuracy
It can be imported directly into tools like AutoCAD
These files are commonly used for:
Roof plans
Elevation drawings
Site and land surveys
Exporting 3D Data for BIM
For 3D workflows, the standard export is typically a LAS file.
LAS files originate from the laser scanning world but are now widely used for:
Drone-generated point clouds
3D modeling workflows
BIM integration
At this stage, the data is still not ready for BIM tools like Revit — but it’s an essential intermediate step.
Step 4: Import Drone Data into CAD & BIM Tools
Once exported, the data needs to be imported into AEC software.
Importing into AutoCAD (2D)
For 2D CAD workflows:
GeoTIFF files are imported as attachments
DXF files can also be used when vector outputs are required
These workflows support:
Roof drawings
Elevation drawings
Topographic surveys
2D measurements and line work
The drone data acts as a scaled, accurate background layer, enabling tracing, markup, and precise drafting.
Importing into BIM Tools (3D)
For 3D workflows, there’s an additional step.
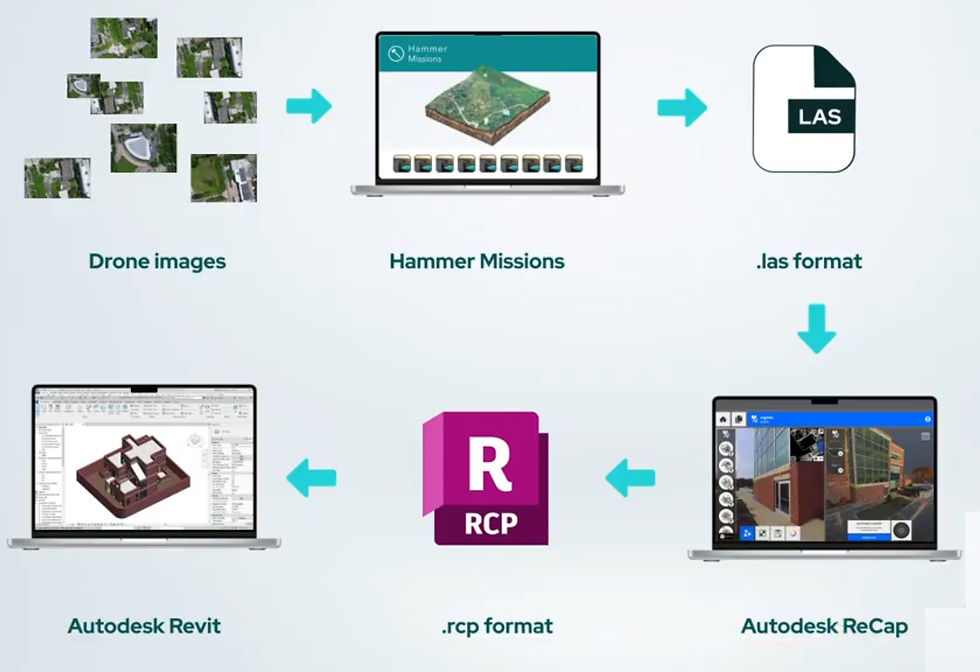
Most BIM tools, such as Autodesk Revit or Civil 3D, require point clouds in RCP format.
To achieve this:
Import the LAS file into Autodesk ReCap
Convert and export it as an RCP file
Import the RCP file into Revit or Civil 3D
While this adds complexity, it allows drone-derived point clouds to integrate cleanly into existing BIM environments.
Step 5: Working with Drone Data in Practice

Once imported, drone data becomes a powerful working asset.
Using 2D Drone Data
In AutoCAD, users can:
Trace new drawings
Perform measurements
Create elevation or roof plans
Use orthomosaics or façade mosaics for markup
Because the data is scaled and accurate, it can be trusted for real-world measurements and design decisions.
Using 3D Drone Data
In BIM tools like Revit and Civil 3D, point clouds can be used to:
Measure distances and volumes
Create cross-sections
Perform cut-and-fill analysis
Model existing conditions
Compare design intent with as-built conditions
The ability to “slice and dice” 3D point cloud data gives AEC professionals far greater insight than traditional site surveys alone.
Recap: The 5-Step Drone Data Workflow
To summarise, making drone data useful for AEC professionals follows a clear five-step process:
Capture the data correctly, based on the final deliverable
Process the data into 2D maps or 3D models
Export the data in the right formats (TIFF, LAS, DXF)
Import the data into CAD or BIM tools
Work with the data to measure, model, and analyse
When done correctly, drone data becomes far more than imagery — it becomes a core input into architectural design, engineering analysis, and construction planning.
Drone technology continues to evolve, but its real value lies in how effectively data can be captured, processed, and integrated into existing AEC workflows. Platforms like Hammer Missions are designed to bridge that gap, making drone data easier to transform into real, usable outputs for professionals across the built environment.
If you’d like to see this entire workflow demonstrated step by step on desktop, keep an eye on our upcoming videos — and as always, thanks for reading.
Interested in learning more about drone-based facade inspections or seeing how AI can enhance your workflows? Reach out to the Hammer Missions team — we’d love to show you how to bring this process to your next project.
About Us
Hammer Missions is a software AI firm helping companies in the built environment leverage drones and AI for assessing existing conditions. Having seen 5000+ projects, we're pleased to be working with leading firms in AEC to streamline and scale the process of facade inspections. If you're looking to learn more about how AI can automate and accelerate your building assessment projects, please get in touch with us below. We look forward to hearing from you.


