A Guide to Drone Photogrammetry
- Hammer Missions

- Jun 14, 2022
- 4 min read
Updated: Feb 20, 2023

Overview
The key to great drone photogrammetry is high-quality data collection, here at Hammer Missions we pride ourselves on the ability to help our users achieve high-quality data through our software platform.
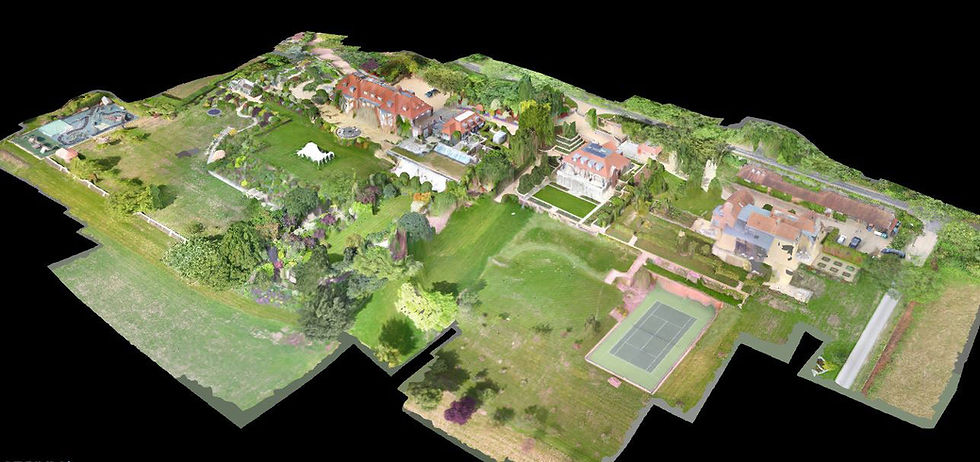
Hammer Missions includes a 3D modelling mission as part of our all-in-one solution. In this mission, Hammer generates a double-grid flight path inside the user-defined shape, flies the drone along the generated flight path, and takes pictures continuously, maintaining the correct image overlap in between pictures.

This data collection enables you to utilise the output to produce photogrammetry or a 3D rendered object (construction sites, buildings, structures, etc).
So, what is Drone Photogrammetry and what are the steps involved?
In this guide, we will explain the process and how you would achieve the 3D Output whilst maintaining the highest quality data collection.
The key to great drone photogrammetry is high-quality data collection.
What is Photogrammetry?
Photogrammetry, in easier terms, is the collection of precise measurements from user-generated photography.
It involves taking a set of overlapping pictures of a structure, construction site, building, or any other object or environment you want to render and converting those pictures into a 3D model using software specifically designed for this purpose.
Photogrammetry can be used in various applications such as architecture, construction, inspections, and surveys to name but a few.

How Photogrammetry Works
There are several stages to obtaining your final 3D rendered image, here we will look at the key elements to producing the best quality photogrammetry.
Data Collection (Photography)
The essential part of photogrammetry is the collection of high-quality data. The quality of the photography will determine the output of your final rendered image.
We would recommend a camera with a high megapixel rating, anything above 18 Megapixels should produce a more than adequate result but obviously the higher the megapixels the better the final render.
Get our free sample drone dataset over here.
Overlap
The photos should be set up to overlap each other to keep consistency in the collection of data and to help match the photography sequentially when it comes to processing. Again this overlapping brings an extra level of quality to the final render and we would recommend an overlap of 70% to 80% to make sure you are collecting the best quality data.
Obliques
Generally, Photogrammetry, or 3D modelling, is collected from above in a grid pattern but we would recommend collecting additional data in the form of vertical capture where, for example, you would photograph the side of a building or structure to obtain a more accurate data. Again we would recommend an overlap of 70% to 80% to keep the consistency and to match the nadir data collection. This is known as Oblique Capture and should be used in conjunction with your original method of data collection.
Software Solution
Hammer Missions software solution will enable you to achieve high-quality data collection by using our pre-defined modules designed for both 3D Mapping and vertical mapping to collectively produce a high-quality final 3D render.
Considerations When Collecting Data for Photogrammetry
Below we have highlighted some key considerations when collecting data to be used in photogrammetry. These factors are important and could easily impact your project if not adhered to.
1: Your mapping area should be well lit as shadows, reflections and transparent objects can affect the way the software process the final images. These areas can cause artefacts to be produced in the final render and will not give you a true representation of your mapped area, structure, or building.
2: Try and avoid direct sunlight or times of the day where areas of your subject are exposed to bright sun. Ideally, the collection of data for photogrammetry should be shot in overcast conditions to mitigate over-exposed sections of your final render. This could be an area that is important to your client or stakeholder. Below is an example of a shot that was taken in direct sunlight, as you can see one side of the roof is over-exposed and the other side is under-exposed.

3: Used a fixed focal length lens, do not change the focal length or zoom whilst shooting as this will cause discrepancies in the collection of data.
4: Try to take photos from all angles. Typically photogrammetry is collected from the nadir (top-down) position but here at Hammer Missions we would recommend not only collecting data using our 3D Mapping Mission but combining that with one of our vertical data collection missions to capture the obliques. These can include Facade Mapping, Lateral Capture, and Tower Mapping

5: Avoid moving objects in the mapping area or in the background as these will cause artefacts in the final render. The mapping area should be static to obtain the best results.
6: The structure, building, or area you are mapping should always fill the main part of the image to ensure data collection is accurate and you are only collecting the subject that is required.

7: Images should overlap, we would recommend an overlap of 70% to 80% to keep the consistency for accurate data collection. Hammer Missions 3D Mapping Mission automatically gives you the option to set your overlap so that your data collection for photogrammetry is accurate from the moment you take off.

8: Try not to take multiple images of the same spot, using Hammer Missions will eliminate this as it is an automated process whereas taking pictures manually can sometimes generate very similar photos that can cause the render process to miscalculate where the shots are placed when it comes to processing.
9: The more data you collect the better quality of the final result will be. You can always filter out poor-quality shots to reduce processing time.
The more data you collect for Photogrammetry, the better quality of your processed image. Hammer Missions helps you collect that quality data though the use of our software platform
If you would like to learn more about Photogrammetry and how to collect high-quality data using Hammer Missions please see the post:
If you'd like to try out photogrammetry, you can download our free sample drone dataset over here.
Conclusion
We hope this guide helps you understand the steps involved in photogrammetry and the importance of collecting high-quality data. If you'd like to learn more about how to high-quality data and get the most out of your drone missions, please feel free to visit our learning resources.
If you haven't got a Hammer account as yet and would like to try Hammer Missions you can get started on our free trial.
To learn more about our enterprise solutions, including mission collaboration, data processing, and AI solutions, please contact us at team@hammermissions.com.
We look forward to hearing from you.
— The Hammer Team