
How to Collect High Quality Data for Photogrammetry
- Hammer Missions

- Apr 27, 2022
- 6 min read
Updated: Feb 20, 2023
Overview
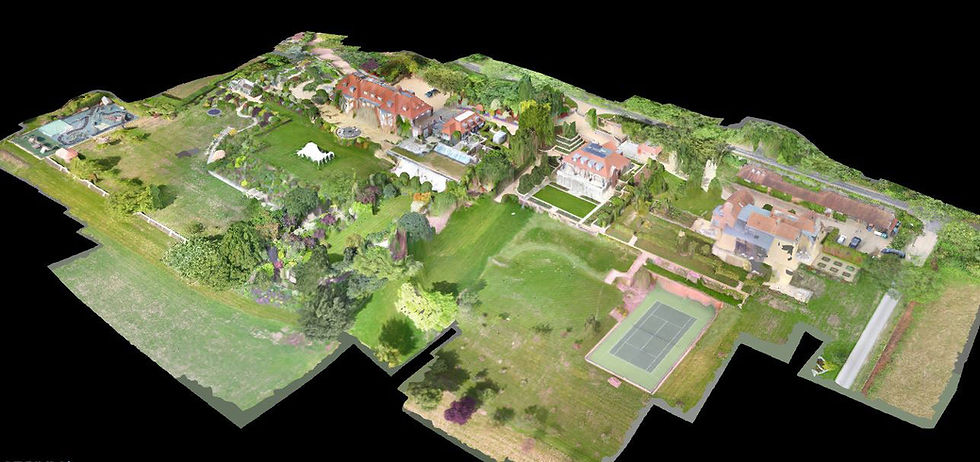
As a Drone Operator we know that the collection of high-quality data is imperative to producing the best quality image, whether that be video or photography, it's all about the collection of that data.
In this blog post, we are going to discuss the method behind that data collection and explore some of the key factors when collecting high-quality data for the purpose of photogrammetry
'High-Quality Data is Imperative to Producing the Best Quality Image'
Data Collection
When collecting high-quality data for photogrammetry there are some factors to consider. Below we will give you an insight into these factors and how they will benefit your data collection.
1. The Importance of GCP's
GCP's, also known as Ground Control Points are points that are laid out on the ground that have known coordinates.
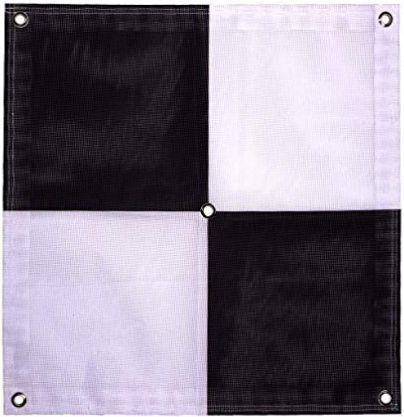
A GCP is often a square of chequered fabric, as shown above, that is laid down across a
site at various designated spots. These markers act as a known coordinate points.
As stated, these points are laid down across the site and are measured using an
accurate GPS device for example the DJI D-RTK 2 GNSS Mobile Station to gain
centimeter accuracy.
This data can then be tied in with the GPS information to create your final
photogrammetry image. This extra data will will greatly improve the quality and
accuracy of your finalised project.
2. Using High Overlap and Optimal GSD
Using high overlap and optimal ground sampling distance (GSD) will ensure that the
data you are collecting is accurate and contains no missing information.
High Overlap basically enables us to 'bridge' gaps between the photography.
By setting up the software to overlap the photos eliminates blank spots when the
mission is in flight and helps photogrammetry software to find "key points" in the images to match, which helps in the overall stitching of images. Overlapping is usually set at around 70% which means for every photo taken, 70% of that photo overlaps with the last giving you a higher quality output when you come to process your data.
Ground Sampling Distance, as the name implies, refers to the amount of ground /
surface area covered by a single image in flight. If you're flying a mapping flight with
the camera facing down (nadir position), then this distance is basically the amount of
ground covered by your drone per image in flight.
The lower the GSD, the higher the resolution of the flight and the more details you can
see in captured images, therefore improving the quality of your data.
More information on GSD can be found in our post Calculating Ground Sampling
3. Avoiding Motion Blur
Motion blur is the apparent streaking of moving objects in a photograph or a sequence
of frames and is something that you would need to avoid, or at least reduce the risk of,
when capturing data for photogrammetry.
There are two methods that you can use to avoid motion blur with Hammer Missions
firstly is the option to Stop and Capture.
This is an integrated feature in the Hammer App where you can select Stop and
Capture from the flight menu. Selecting this will have drone stop at each point on the
planned mission and take a photo thus heavily reducing motion blur.

The second option is to manually set the camera according to the lighting conditions,
this option will calculate your motion blur letting you adjust the acceptable parameters
accordingly to reduce the motion blur whilst in flight.
This is detailed in our blog Preventing Motion Blur in Drone Photogrammetry Flights
4. Flying in Optimal Lighting Conditions
Making sure you are flying in optimal lighting conditions is essential for capturing data
that is usable in your photogrammetry project.
If a subject is lit to hard or isn't lit enough the final outcome, once you have collected all
the data and processed it, could looked washed out or patchy.
This can in most cases be overcome by manually setting your camera's exposure, giving
the lens of your camera more or less light to process. Generally speaking, on a dull day,
you would want more exposure (more light entering the drone's camera) and on a
bright day, you would want to limit this exposure.
It isn't recommended that you set your exposure to auto for collecting photogrammetry data.
Change in ambient lighting conditions during drone flights is very likely - your drone might suddenly be capturing an area that is dimly lit or has shadows all over it. You might also experience a sudden cloud cover on a sunny day, again drastically changing the lighting conditions of your flying environment.
If you have auto exposure set the camera will constantly be adjusting itself and will create inconsistencies in the data produced.
Our blog post Why Automatic Exposure Settings for your Drone is a Bad Idea covers this topic in further detail.
5. Flying with Optimal Flight Speed
Speed is the key, but not too fast or you will end up with unusable data, so, what is the optimal flight speed and how do we configure it?
Well that's where Hammer does the work for you! When planning your mission in the Hammer Hub optimal flight speed to automatically configured for you as you input your flight parameters.
But how did we calculate the optimal speed? Our blog post How to Calculate the
Optimal Flight Speed in Drone Missions? gives you an insight on the math behind the
calculations.
You can also calculate this yourself......
Get our free and comprehensive spreadsheet designed with Drone Mapping and Inspection formulas over here
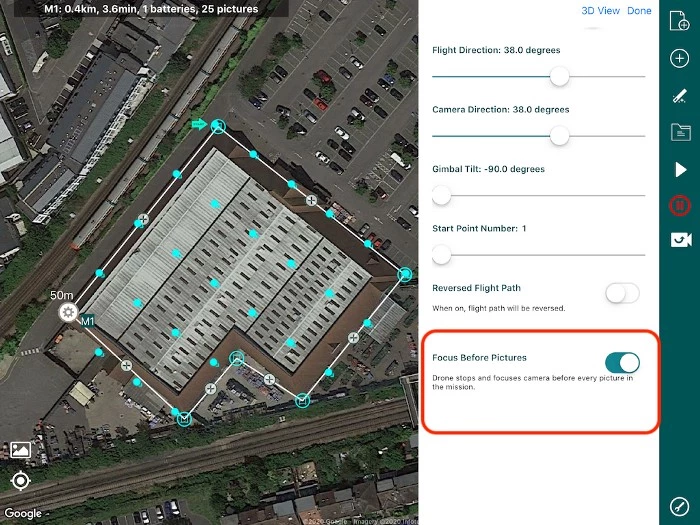
6. Using Ground Offsets if Mapping a Building or Structure
How do we make our data more accurate when collecting photographing a building or
a structure?
The easiest way to do this is by using a built in feature in Hammer App called Ground
Offset.
In simple terms, ground offset offsets the height of the building or structure you are collecting data for against the altitude of the drone. This is a huge benefit, as opposed to the data being collected from the ground height its actually offsets the height of the building or structure therefore giving you a closer more accurate image.

In the above example you can see that the drone is at an altitude of 82ft and the ground offset is set at 42.7ft (which is the height of the building structures). This gives us a tighter mapping profile and in turn will produce a higher quality of data.
You can explore this further in our post Ground Offset in Hammer Missions
7. Capturing Focused Images
An out of focus image has the potential to render the whole project unusable but at
Hammer Missions we have an easy solution for that.
Within the Hammer App you are able to set Auto Focus Mode which will automatically
set the focus before the mission has started, enabling you to concentrate on the mission without having to worry. This setting can also be turned off if you would prefer
to manually set the focus via DJI Go.
For taking obliques by using the Inspection or Facade Missions you can actually set the camera to focus before each picture is taken from within Hammer App mission view.
For further information please see our blog post Auto Focus-Before-Pictures in Hammer
Get our free sample drone dataset over here.
8. Using a High Megapixel Camera
Camera technology in recent years has advanced ten fold, gone are the days of low resolution cameras.
Today's camera's are usually upwards of 12 Megapixels with the latest drone
technology on consumer drones being anywhere from 20 Megapixels right up to 48!
The general rule is, the higher the Megapixel the better the quality of photo, therefore providing you with better data quality.
The latest camera technology from some of the brand leaders in the industry include DJI's Zenmuse P1 a full frame camera which has been specifically designed for photogrammetry and boasts a 45 Megapixel Full Frame Sensor

Picture courtesy of DJI
Another major contender is the PhaseOne iXM
A revolutionary drone camera that boasts either a 100 Megapixel sensor or a 50 Megapixel sensor dependant on your budget and come with a range of lenses from 35mm up to 300mm.
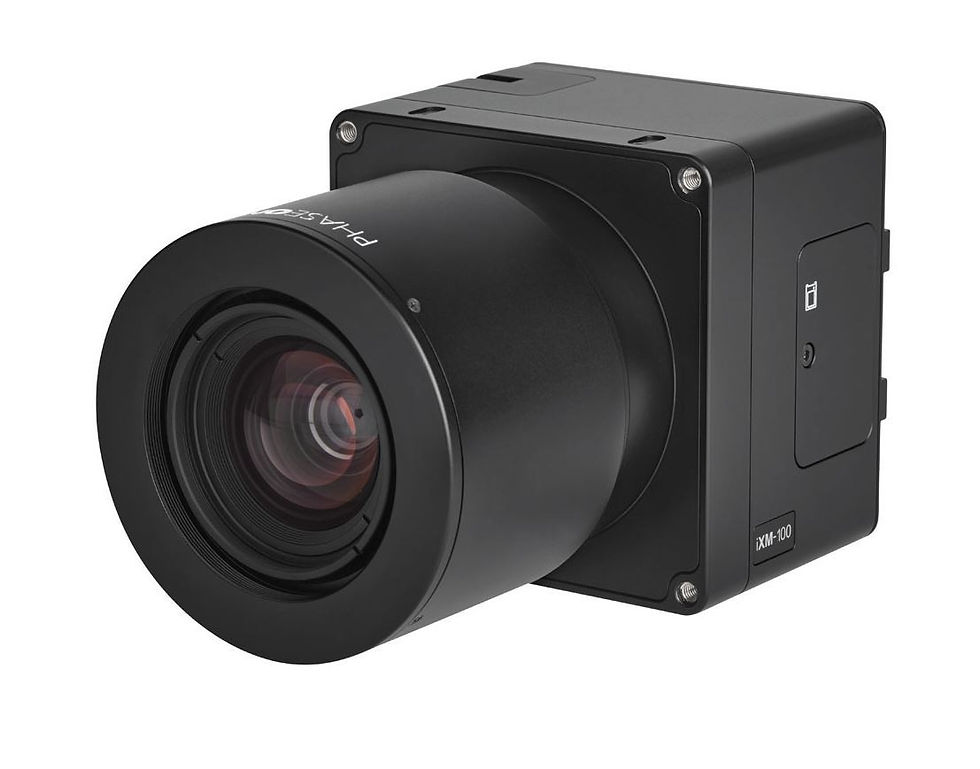
Picture courtesy of Geospatial
Conclusion
We hope this blog post helps you understand how to collect high quality data for photogrammetry and the importance of the factors that you may have to take into account.
If you'd like to learn more about how to high-quality data and get the most out of your drone missions, please feel free to visit our learning resources.
If you haven't got a Hammer account as yet and would like to try Hammer Missions you can get started on our free trial.
To learn more about our enterprise solutions, including mission collaboration, data processing and AI solutions, please contact us at team@hammermissions.com.
We look forward to hearing from you.
— The Hammer Team


