
Advanced Waypoints with Hammer Missions
- Hammer Missions

- May 27, 2020
- 4 min read
Updated: Feb 6
Overview
Hammer is an adaptive flight automation platform the commercial drone industry. We support a large number of mission types on both mobile tablets through Hammer App and Desktop environments through Hammer Hub.
Whatever your use-case, Hammer can adapt to it.
Tutorial
In this tutorial, we will focus on waypoint missions.
This type of mission is useful for aerial photography or any form of customised aerial work.
In this mission, Hammer calculates the correct heading for the drone based on the heading mode set in the waypoint mission and calculates a curved flight path for the drone is this option is set.
Steps to Create
Tap on the add(+) button in the top right corner.
Choose ‘waypoints’ from the missions view
Draw points on the map as per the mission.
Note: Waypoints can also be drawn by flying the drone to the appropriate GPS coordinates and tapping the back (right) button on the remote controller.
4. Once you are happy with the waypoints, click OK on the right panel.
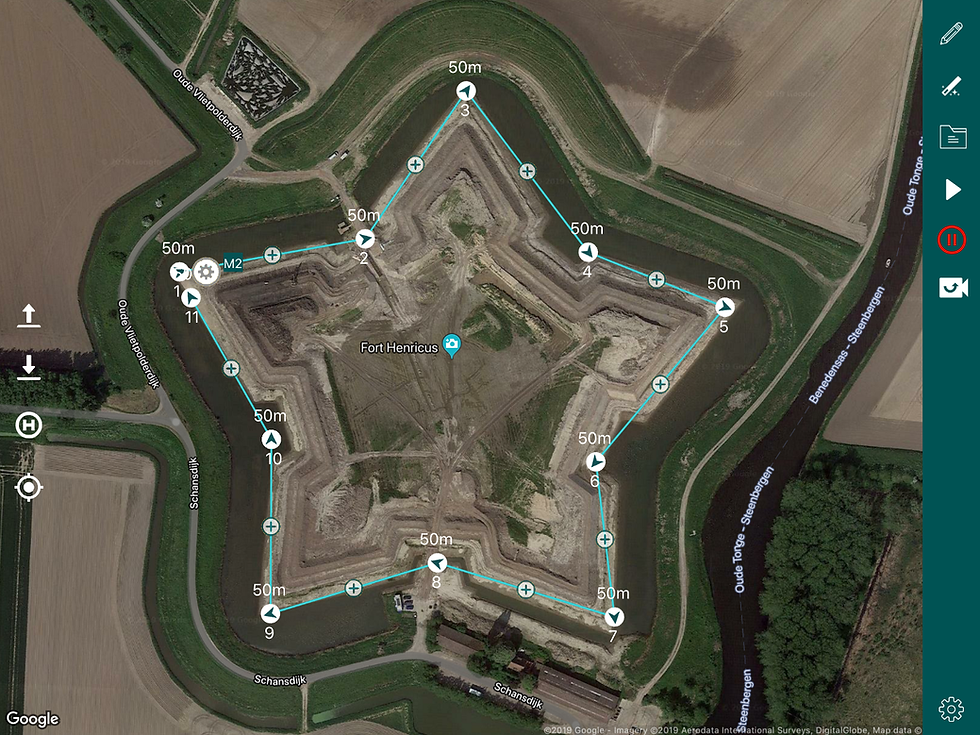
Creating a waypoints mission
Steps to Configure
Tap on the white gear icon right beside the first point to configure the mission, which will open a settings menu.
If not already chosen, choose ‘waypoints’ for the mission type.

Configuring a waypoints mission
Brief description of the available settings:
Camera Point: Customisable point that the drone will orient itself towards during the entire mission. To set this point, simply tap on the camera point box and then select a point on the map.
Note: Setting a camera point will automatically set the heading mode of the mission to - ‘Towards Camera Point’
Heading Mode: This setting specifies the heading/orientation behaviour of the drone throughout the mission. There are 3 different heading modes:
Direction of Travel: The drone will automatically take the line’s direction of travel as the heading during the mission.
As Per Waypoint Heading: The drone will orient itself to match the headings set for each individual waypoint. (Simply tap on each individual waypoint to set its heading, more on this later)
Towards Camera Point: This drone will orient itself to face the set camera point throughout the mission. This mode is set automatically when a camera point is set.
Curved Flight Path: When this setting is on, the drone does not stop at every waypoint and instead turns smoothly, forming a curve at every waypoint. The degree of curvature can be set by tapping on each individual waypoint (more on this later).
Configuring a waypoint mission — Curved Flight Path is On
Steps to Configure Each Waypoint
Tap on any waypoint that you wish to configure.
A settings menu will appear. To navigate to previous or next waypoint, simply tap on the Previous and Next buttons at the top of the menu.

Configuring each waypoint in the mission
3. Brief description of the available settings:
Action: This setting determines the action the drone will take when it reaches the waypoint being configured. There are 3 actions currently supported:
Take Photo
Start Video
Stop Video
Camera Point: Customisable point that the drone will orient itself towards when it reaches this waypoint. To set this point, simply tap on the camera point box and then select a point on the map.
Note: If a camera point is also set for the overall mission, setting a camera point for individual waypoints will warn the user and remove the overall camera point for the mission.
Altitude: Flight altitude of the drone when it reaches this waypoint.
Heading: Drone’s heading when it reaches this waypoint.
Note: Heading for an individual waypoint can only be set when the overall mission is in the ‘As Per Waypoint Heading’ heading mode.
Gimbal Pitch: Pitch of the Gimbal when the drone reaches this waypoint.
Corner Radius: This determines the curvature of the smooth turn when the drone is close to this waypoint.
Note: Corner Radius can only be set when the overall mission setting ‘Curved Flight Path’ is switched on.
Tip: If you’d like to apply the settings to all the waypoints in the mission, simply tap on the Apply to all button in the bottom right corner of the setting.
Steps to Simulate
Once you are finished creating and configuring the mission, simply press play button in the right panel.
If no drone is connected, Hammer will prompt you to add a simulator, press OK and choose a home location for the simulation. Then press OK.
The simulation will begin and you’ll see a simulated drone appear on the screen flying the waypoints mission.
Steps to Fly
Once you are happy with the created mission, simply connect your drone to Hammer through the USB port on the remote controller.
You’ll see a drone icon appear on the screen at its current location.
Press Play to start the mission.
Press Pause anytime to pause the mission, and play to resume the mission.
Summary
And…that’s it! Now you know how to create, simulate and fly your own waypoints mission in Hammer. If you currently do not have access to the iOS app, feel free to contact us at team@hammermissions.com or download the app from the app store.
If you’d like to learn more about other missions supported in Hammer, please visit our mission tutorials.


